Why the Blog......

9 years now into the blog, and lots and lots posts on the SWOFFING (Salt Water Fly FishING) in and around Darwin - maps, flies, outings and musings

Hope your enjoying it!

Showing posts with label crustacean fly. Show all posts

Tuesday, September 1, 2015

Crustacean pattern for Bynoe flats

On the vastness of the world wide web.......... for months and months I have been eyeing off and drooling over some of the countless and most realistic life-like prawn/crab patterns I could find
Not just to cast to fish but most importantly to tie, tie and tie some more
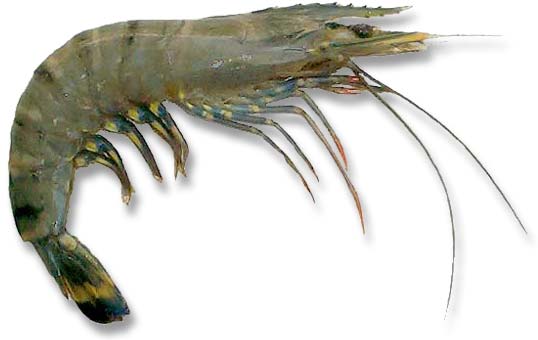

When tying prawn and crab patterns - materials are always the issue, 
Additionally, such patterns usually involve a plethora of a variety of materials

So when looking through your own tying cabinet............
It is about what do you have and what you don't have? 
And if you don't just the right material - what can be used instead of that suggested material? 
Critically, finding just the right bits and pieces to go with the other materials 
As too, finding materials with just the right sort of movement or lack thereof
And there is the matter of colour and or translucence of a material to think of - particularly with prawn patterns
Additional considerations are the 'eat-me-quick' triggers like size, eyes, legs, carapace and claws  

So after evaluating all these things and the materials I had on hand.....
Today I finally had a go at tying some, but prior to tying/making any fly, I like to organize my tying space.
First pack away everything but what is needed - materials and tools etc from last set of flies I had recently tied 
Then getting together all the bits I need on the one piece of foam
Lined up and ready to be used
as many as possible materials as possible are pre-cut and prepared where required, also the right quantity of everything counted out, and don't forget hooks need to be debarbed 

In this case of a prawn/crab pattern - the eyes are made. For this version, small black beads are heat welded on to 80lb mono.  For the 'heat weld', I just melt tip of mono stalk, then the bead is pushed onto the melted blob on end while pushing the bead and molten blob of mono up against a slab of metal or base of tying vise to ensure it is secured. 
If tying say 10 flies, I would feed twenty beads (two eyes for each fly - 2x10 = 20) onto a single long length of mono with a knot on end to stop them sliding off. The length of the mono would be enough for the twenty eye stalks and a couple extra just in case. Better then trying to pick up twenty stalks and twenty beads individually each time. After each 'heat weld', cut off stalk with side cutters from full length of mono to desired length, insert cut end into a piece of foam and make a few more. To finish off the eyes, give them a couple of coast of clear nail polish. Set aside to dry.   

Then the claws were made - these claws are a short piece of rabbit zonker with 5 minute epoxy stroked along its length but more so at base with not too much at tip of fur so still some subtle movement.
Less than hour prep for all this - then ready to tie the fly. 
This all makes the tying process far more faster to tie - more time efficient when you do the same thing repeatedly before putting down particular tools (or cleaning fingers after stroking epoxy onto the claw zonker).  

So with all all credit given to the multiple and highly talented fly tyers on the web, who have inspired me with their countless and very impressive prawn/crab patterns
But in the end - primarily based on the actual materials I actually had on hand that I felt worked worked together........

This is the pattern that ended up being tied........ part crab, part prawn, part lobster, part crayfish
A mutant of sorts!!!

Can hardly wait to test it out on the Barramundi, Threadies, and Blue Bastards that inhabit and frequent the flats of Darwin and Bynoe Harbours

So here's the sequence of how I tied it
  • Lead dumbbell eyes tied in at the hook eye
  • A touch of pink ice dubbing tied in at the hook bend
  • Then rabbit zonker either side of hook shank at hook bend - using shoulder of pink ice dubbing tie in point to flare the zonker. may require a few judicious and purposeful wraps of thread to assist this flaring. 
  • Some pearl ice dubbing all around hook shank at the claw tie in point but only a whisper of this ice dubbing material - not too much at all
  • Turn fly over in vise so hook point is up
  • Then rubber leg material - in this case grizzle rubber legs
  • Then eyes on stalks either side of hook shank with black beads half way along claw length
  • Then tie in Flash'n'Slinky material in 'shrimp' colour for this version - keep material on the to top and the sides of pattern as it would sit on the mud flats
  • Finally, tie in some grizzle craft fur at hook eye - ensuring material lays along the top of the fly

Like always - tie ten of them and go SWOFFING


I have named it the Bynoe P&C fly  (basically a Bynoe Prawn and Crab fly)
Hopefully I can entice some flats inhabitants in Bynoe Harbour to like the pattern as much as I do 
(even though a few seem to have too much bulk in their claws)
Heading to Bynoe on weekend - so here's hoping the opportunity is fruitful

Enjoy life - go fly fishing, better still go SWOFFING!
Richard


Thanks
Richard Carter
Middle School Science Teacher

Palmerston Christian School

Monday, July 28, 2014

Bynoe - Simms and Turtle morning - trip report

Up at 6, on water 6:30am, arrive at meeting point - 20 minutes late (hate being late!), the meeting spot was where a teacher friend's sailing boat was anchored at the mouth of Six Pack Arm, who was spending weekend at Bynoe.

At the sailing boat, a bit of coffee for those inclined and then the bait fisherman swap some live bait and dead bait between each other, before we head off on the 20 minute run to Simms reef at the front of Bynoe Harbour.

The wind gods are kind with hardly a breeze about, though strengthening towards midday.
Arriving at 7:15am at the reef, the high tide is covering the reef, the only sign of its presence is a plethora of tiny bubbles rising to surface, even though hours after it was submerged by the incoming tide. Additionally, due to impact of the tidal flow water pushed up from the depths against the side of the reef structure, concentrates the flow of water and creates a rippled edge to indicate the reef's position (easily seen in left side of the image here and in video footage).


first queenie of morning
Queenfish are herding bait against this line and slashing periodically into them giving me something to cast to. My baitfish colleagues are on the drop off edge drowning baits hoping for the big broad barred mackerel that are suppose to be about.(PostScript: the friend on the sailing boat got one big meter plus Mack, trolling a spoon behind the back of their boat on way back to Darwin in afternoon, and another friend who went offshore, Dundee wide, had large packs breaking the surface with their feeding activity and lots of birds above them, showing where to troll)

Back to subject of Simms Reef, hoping it to be a sign of a good day starting - on the fifth cast of the morning, I catch a small queenfish. Within the first half hour I have 6 queenfish to 40-50 or so centimetres to hand and released. Larger periodic bust ups are occurring on the edge of reef drop off 50-60m away but nothing consistent enough to encourage a move. The danglers (bait anglers) have nothing. The score ends up - 6 to zip, in favour of the feather tosser!

Nothing else for the next two hours, the splashes get less, the wind increases and the reef gets exposed but no more fish. As Simms Reef gets exposed by about a metre of rock and sand bar, it is usually when I get more action but it isn't the case today - time for some flats fishing in the lee of Turtle island.

In hind sight I should have gone straight to the creek and channel behind the island for a hour or so as the water is just leaving the last leaves of the mangroves but instead I fished the couple of small bays on SW side of the island itself. Because by the time I decided to do that, it was high and dry and I couldn't fish it like I had planned

Still in the bays of turtle island, I had one good reaction from a 70 or so centimetre barramundi to the BFCW fly. It was lying very still but yellow tail highly visible in about a meter of water, I saw it too late not 5 or so metres from boat, and the boat despite turning off electric motor quickly continued to drift towards it with momentum taking me to within 2 metres of the fish. A good cast for a change, and as the fly landed near its head, an immediate response from the barramundi as it flared its fins and moved to the fly 30cm away. The fish followed, followed the slowly stripped fly, paused,  followed - before it sees the boat so close to it and flashes away. And that was only the first 10m of the two bays - I was beginning to think my barramundi nemesis days might be lifted this session.

However, 7 spooked and 3 unseen till too late to see barramundi (see later for details) - a nemesis they still are but I did greatly enjoy myself on the journey this time rather than being frustrated by it. But what an hour it was stalking these fish in the bays!

Once so busy watching the fish inshore, I missed three large barramundi hovering in deeper water over a small cluster of boulders on the other side of the boat till my peripheral vision saw them rapidly leave for waters untraveled by black sided boats with a poor sighted, big ugly man on it.

I also saw a big threadfin accompanied by a couple of smaller ones, herding small baitfish with their long chin filaments, the baitfish were 3-4cm and leaping above the surface to escape the predator corralling efforts but as I moved closer the threadfin where spooked by wave slap on the hull (?) way before I got into casting distance.

On the flat opposite the entrance to the Six Pack boat ramp arm, I was moving the boat along the flat after barramundi in the corners of snake drains and along comes this easily metre plus dark shape harassing baitfish along the way. It was a very large queenfish, a single cursing the flats. Again a poor and rushed cast from me, lands the fly on its head and it scoots off rapidly to deeper water. From the episode I learnt to look more closely and careful, along with a few glances further along in case another comes my way. One did (same one?), I had 6 or so casts at it - for a follow or two but no commitment from the fish - I think I needed a different fly on than the BFCW fly. In such shallow water the big fish was half on its side - it would have been absolutely gorgeous mayhem to hook up to such a big fish in such shallow water! All a 100 meres from deep water! Hopefully, next time.

With wife and two young kids at camping ground awaiting my return, I was off the water around midday and packed up heading home by 2:30pm. (PostScript, one of the bait guys I was with stayed out a bit longer and told me the barramundi up one creek he visited went absolutely off  with barramundi 'boofing' loudly and everywhere for about an hour, shortly after the turn of low tide began - not that he got any!)

Overall great day, even though not great numbers or size of fish. The added bonus of the 6-0 scorecard to the SWOFFER, the great sunrise and no wind during the morning session, the awesome flats stalk and cast (poorly cast most times I might add) to sighted fish on the flats, watching one fish react so positively to the BFCW Fly. I'll have more of that any day.

Can't wait to get on the water again! !!!!!!


Tuesday, July 15, 2014

Tying a BFCW Fly - Bynoe Flats Crustacean Wannabe

BFCW Fly - Bynoe Flats Crustacean Wannabe

The fly has it's origins in bonefish flies, particularly the Scampi and Squimp flies.
I use it on gravel patches and rock bars locally.

While I tie it mostly in natural colours, I also use white zonker versions and caught coral trout and other reef species with them from the reefs in Darwin harbour. I also had some two-tone magnum zonker, it was black with red tips that was awesome in it's results, while the  material lasted - can't find it anywhere!

Recently I saw a very good reaction to this fly in natural tones by several barramundi sitting on top of gravel patches to the fly. I suspect thinking the BFCW fly to be a crab or prawn imitation. One fish, followed it pausing when I did before tipping on the fly engulfing it - sadly it's gill rakers cut my leader. All in a meter of clear water - great visually to watch unfold.

So here is how I tie it.

Recipe
Hook:   medium length shank of choice, size for barramundi 2/0, for reef species 1-1/0
Rattle: optional - but when I use, I prefer glass rattles
    - tied on and epoxied in batches, prior to beginning to tie on other materials
Thread: white or tan usually chosen to match zonker colour
Carapace: natural rabbit zonker- if available the magnum size is great
Tail tuft: tan calf tail
Legs: orange rubber - the one I use are pumpkin coloured with flecks of sparkle
Eyes: glass beads on mono - red or black
Body: Mylar tubing size to suit (rattle or no rattle)
Feelers: Orange rubber
Head: pale pink calf tail


Method.......  

  1. You can add in a glass rattle at this point as an option - I do this in batches. Tie on with thread the  epoxy, placing on dryer till set.
  2. Cut zonker to size, 1.5 to 2 times hook length
  3. Punch hole in zonker stripe - measure against hook shank to where hook bend will pass
  4. Thread zonker over hook point leave loose for later and then place hook in vice
  5. Apply bed of thread
  6. Tie in tuft of calf tail, ensure spread around shank
  7. Tie in rubber legs either side of hook shank at hook bend - 3 strands per side, varied lengths in pairs, hang a couple past zonker
  8. Tie in eye stalks - ensure to flare the stalks, tie thread tightly up to calf tail, should flare stalks
  9. Slide body tubing over hook shank (and rattle if used)
  10. Tie off tubing with a few fibres hanging past, about 1/3 hook shank past
  11. Re-tie in thread at hook eye,
  12. Tie off top of body tube
  13. Turn hook over and tie in dumbbell or bead chain eyes (weight depends on desired sink rate)
  14. Fold over the zonker strip and tie off
  15. Add in more rubber legs in an 'X' shape to either side of hook shank
  16. Add tuft of calf tail
  17. Tie off thread, apply a touch of glue to thread.
  18. Tie ten more and go catch some fish. >--->>>>)'>