Why the Blog......

9 years now into the blog, and lots and lots posts on the SWOFFING (Salt Water Fly FishING) in and around Darwin - maps, flies, outings and musings

Hope your enjoying it!

Showing posts with label fly tying. Show all posts

Friday, September 4, 2015

What's in your fly box??

Well with my fly boxes that I carry in the boat - there are several boxes to choose from
Let us explore their contents.

The main box is a two-sided boat box a mate got for me
              - Thanks Simon best present ever! (that i didnt have to buy for myself!)
See thru lid is great, so I keep the flies I use the most in it. always on the deck - not in the tackle bag

Fly Box #1 - Side A
This side has my 'go-to' white goat clousers - a must have in tropical waters - and a few larger clousers if the bait being eaten is bigger.
It has a few barra flies (bucktail minnows, whistler variations) but most of my barra flies in another box - these are just there for quick access when needed
It also has in it my new favourite flats crustacean fly the Bynoe P&C (see this blog for details) a prawn-crab mutation of a fly

Fly Box #1 - Side B

Then SideB has my surface flies - Hot Lips Gurglers, Gurglers in a few sizes, crease flies and hard bodied poppers. It also has 30 or so silicone surf candies  (there is a second row that are slight longer in length under tails of the first row on lower left) for the ever-present trevally, queenies and small macks that hang off nearly every rock bar in Bynoe and Darwin Harbours. It also has one algae fly (bottom left corner - used to have four there but they got used - must tie more) for milkies if some come cruising past sipping scum off the waters surface.

Fly Box #2 - Clousers

This box is assorted extra clousers in different materials, colour, size and eye weight combinations. There is also a few crustacean patterns mixed in the box as well
All greens for early morning, Wild Things in fluro orange and chartreuse - used to be hot pink and chartreuse in the box too - will have to tie a few more of those as well.
Also in top left the box has four BFCW Flies
             - that is Bynoe Flats Crustacean Wannabe flies - see previous blog - BCFW Fly
This box is looking a little empty
           - will have to fix that before the Bynoe Sheep Station Stakes later this year (October 10th & 11th)

Fly Box #3 - Big Arse Minnows box
This one has my mega flies in it
Big flies for big fish - the ones on right are whistler variations - big barra, big Gt's - 4/0 to 6/0hooks, some tandem hooks, most with mono weed guard loops. Also a few really heavy flies for bottom bouncy for black jew (hooked a few but haven't stopped one yet!!!) and reef dwellers but very boring fishing waiting for the fly and line to get deep enough!)
When I see big bait being harassed and bursting through the surface - this is the box of flies I go to - My 10weight rod is always rigged in the boat ready to cast with a large fly on the leader - just in case the 'big one' comes along!
Bottom right are my tandem hooked garfish flies for big Spaniards - worked well on east coast, no so yet here in Darwin region.
Left side has some double bunnies, some segmented baitfish with two heavy duty hooks 
Bottom left - are some new flies tied recently my version of the GnG Hollow Mullet - see previous blog for details
Finally top left - a heap of bend backs in popular hard bodied lure colourings  - tiger, elton john, gold bomber. These on quite strong and heavy hooks.

Fly Box #4 - Baitfish

Ok, this fly box on the left side has a heap of epoxy surf candies and some jelly bean candies (fatter surf candies). A heap of white polar fibre minnows on various hooks and eye configurations. Some on worm hooks designed to be weedless. Got five good fish on one of these versions of this polar fiber fly in succession before putting the hook through my thumb when releasing the fifth fish and the leader got tangled in the fish's thrashing and it dragged the leader thus the hook, through my hand and the hook point drove into thumb. Great fly - but that mishap cost me 6 hours waiting in emergency (I left barb not crushed and it was resting against bone, so was quite painful when I tried to de-hook it myself). And three hours driving round trip to hospital and back to tournament to fish next day!

Top left has a few mackerel flies that are nothing more then a hook, a tentacle off a rubber squid (those that are used in trolling applications on the head of a fresh garfish) and the tiniest touch of flash. These are for certain times when very, very big macks visit the tip of Indian Island, right up in the shallows each year sipping small baitfish as gently as a trout would sip a mayfly. I was amazed first time I caught a huge Spaniard in such shallow water on such an anorexic and small fly - almost didn't use the fly when it was suggested - but listen to the locals when you first arrive in a new location - always!
Also on middle right side are some flashy profile flies and above them some silicone coated fat boys for dirty water - great presence in the water - they give a big and noticeable bow wave when retrieved such is their profile and punch through the water. Also a few extra 3/0 bendbacks spoken about above in between the red/white and all yellow silicone fat boys (the yellow ones here were nicknamed 'Canaries' on a trip to Weipa some 25 years ago when it was the most productive fly I took - everyone in the group wanted one!).
Top right of the left side are some chartreuse rubber tail coneheads, these I used for Mr Twister soft plastic substitutes on the east coast (a staple fly for me some 10 years ago) for big flathead in Jumpinpin. Who knows what species might take a preference to them up here in the tropics when everything else fails?

Fly Box #5 - Thing Box - Barra-Threadies-Toga
These are mostly barra buster style flies - variations of whistler and pink things
Barra busters have rabbit zonker as their prime tying material. Most have weed guards as they get cast  more often then not far into mangroves and billabong weed beds. The red head white tail version is my favourite colouration for toga - yet my usual fishing partner uses orange/black colourations and we both catch plenty of toga! Its a confidence thing I guess. The pink and white colourations are great flies for Bynoe flats when barra are cruising about - depends of course on water colour at the time. This box is crammed full of these, even have a foam insert to squeeze in a third layer of flies into this fly box.

Fly Box #6 - Crabs
Always have a box of crabs in neutral colours in case of blue/black bastards. And if the fishing gods are smiling your way - and you are out the front of Bynoe and close to its sandy islands - the whispered presence of the elusive Permit becomes a reality
So here are the boxes I take on the boat - many if not most - just in case of the off chance something unique and different (hopefully big!) comes along. 
But so too plenty of the usual 'go-to' flies if the usual species are about at the location we find ourselves SWOFFING
The wooden boxes I use for my flies are what my students make in Yr8 wood work class from recycled wooden pallets- each year for examples to the students I make a box or two for me or gifts for others as well

As much fun as they are to tie.....................  (if u need any recipes or tying instructions - contact me)
Go use your flies, they cant catch fish when not in the water!
                  
               The Stig.


Tuesday, September 1, 2015

Crustacean pattern for Bynoe flats

On the vastness of the world wide web.......... for months and months I have been eyeing off and drooling over some of the countless and most realistic life-like prawn/crab patterns I could find
Not just to cast to fish but most importantly to tie, tie and tie some more


When tying prawn and crab patterns - materials are always the issue, 
Additionally, such patterns usually involve a plethora of a variety of materials

So when looking through your own tying cabinet............
It is about what do you have and what you don't have? 
And if you don't just the right material - what can be used instead of that suggested material? 
Critically, finding just the right bits and pieces to go with the other materials 
As too, finding materials with just the right sort of movement or lack thereof
And there is the matter of colour and or translucence of a material to think of - particularly with prawn patterns
Additional considerations are the 'eat-me-quick' triggers like size, eyes, legs, carapace and claws  

So after evaluating all these things and the materials I had on hand.....
Today I finally had a go at tying some, but prior to tying/making any fly, I like to organize my tying space.
First pack away everything but what is needed - materials and tools etc from last set of flies I had recently tied 
Then getting together all the bits I need on the one piece of foam
Lined up and ready to be used
as many as possible materials as possible are pre-cut and prepared where required, also the right quantity of everything counted out, and don't forget hooks need to be debarbed 

In this case of a prawn/crab pattern - the eyes are made. For this version, small black beads are heat welded on to 80lb mono.  For the 'heat weld', I just melt tip of mono stalk, then the bead is pushed onto the melted blob on end while pushing the bead and molten blob of mono up against a slab of metal or base of tying vise to ensure it is secured. 
If tying say 10 flies, I would feed twenty beads (two eyes for each fly - 2x10 = 20) onto a single long length of mono with a knot on end to stop them sliding off. The length of the mono would be enough for the twenty eye stalks and a couple extra just in case. Better then trying to pick up twenty stalks and twenty beads individually each time. After each 'heat weld', cut off stalk with side cutters from full length of mono to desired length, insert cut end into a piece of foam and make a few more. To finish off the eyes, give them a couple of coast of clear nail polish. Set aside to dry.   

Then the claws were made - these claws are a short piece of rabbit zonker with 5 minute epoxy stroked along its length but more so at base with not too much at tip of fur so still some subtle movement.
Less than hour prep for all this - then ready to tie the fly. 
This all makes the tying process far more faster to tie - more time efficient when you do the same thing repeatedly before putting down particular tools (or cleaning fingers after stroking epoxy onto the claw zonker).  

So with all all credit given to the multiple and highly talented fly tyers on the web, who have inspired me with their countless and very impressive prawn/crab patterns
But in the end - primarily based on the actual materials I actually had on hand that I felt worked worked together........

This is the pattern that ended up being tied........ part crab, part prawn, part lobster, part crayfish
A mutant of sorts!!!

Can hardly wait to test it out on the Barramundi, Threadies, and Blue Bastards that inhabit and frequent the flats of Darwin and Bynoe Harbours

So here's the sequence of how I tied it
  • Lead dumbbell eyes tied in at the hook eye
  • A touch of pink ice dubbing tied in at the hook bend
  • Then rabbit zonker either side of hook shank at hook bend - using shoulder of pink ice dubbing tie in point to flare the zonker. may require a few judicious and purposeful wraps of thread to assist this flaring. 
  • Some pearl ice dubbing all around hook shank at the claw tie in point but only a whisper of this ice dubbing material - not too much at all
  • Turn fly over in vise so hook point is up
  • Then rubber leg material - in this case grizzle rubber legs
  • Then eyes on stalks either side of hook shank with black beads half way along claw length
  • Then tie in Flash'n'Slinky material in 'shrimp' colour for this version - keep material on the to top and the sides of pattern as it would sit on the mud flats
  • Finally, tie in some grizzle craft fur at hook eye - ensuring material lays along the top of the fly

Like always - tie ten of them and go SWOFFING


I have named it the Bynoe P&C fly  (basically a Bynoe Prawn and Crab fly)
Hopefully I can entice some flats inhabitants in Bynoe Harbour to like the pattern as much as I do 
(even though a few seem to have too much bulk in their claws)
Heading to Bynoe on weekend - so here's hoping the opportunity is fruitful

Enjoy life - go fly fishing, better still go SWOFFING!
Richard


Thanks
Richard Carter
Middle School Science Teacher

Palmerston Christian School

Wednesday, August 26, 2015

A few mullet fies

As much fun as it is - its time to stop casting candies and clousers to the bread and butter species of Darwin harbour (trevally, macks and queenies - well not all the time, of course! --- far too addictive)

So I tied up a few mullet like flies based on a GnG Hollow Baitfish. These on 2/0s - no extra lead wire in base as suggested by #Dronlee of Fly Tying Nation blog - also see his blog for some very interesting flies, all step by step with instructions and tips -- flies for both salt and fresh)

Now I have to get the patience to hunt the fish that would take these flies rather than the excitement of ravaging predators erupting the water surface at the various rock bars and reefs around the harbour

Tied it basically like #Dronlee but I used a tuft of grizzle craft fur in middle after tying in the pink ice dubbing to add the optical allusion of movement when stripped - think it  looks not too bad if I can say so myself!
I also mashed into head area a dollop of clear silicone to help give head shape and to attach the 3D eyes to, additionally with a layer or two of nail polish over this to help keep the 3D eyes on longer.

Come on, go tie some yourself and GO SWOFFING!
You simply can't catch fish while sitting and looking at this blog!

Thursday, August 20, 2015

A few flies tied for next outing

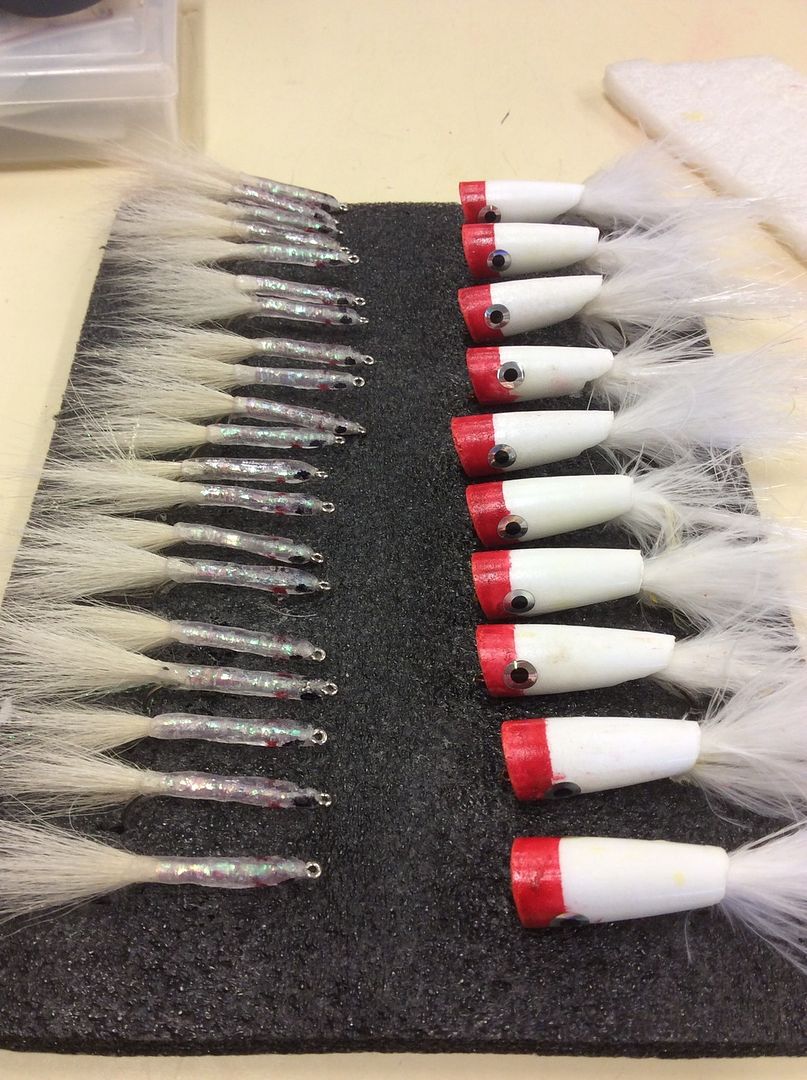
More silicone surf candies to replace the fifteen I lost last weekend to small Macks and queenies
The pelagics at Lee Point couldn't resist this fly as it matched perfectly the predominant baitfish they were eating so voraciously
20 of them this time

very simple to tie - though a little bit tricky with the silicone

Tail of goat hair and Krystalflash- goat hair fragile to toothy critters but Better movement
Underbody - a wide pinkish holo flash wrapped along hook shank
Clear silicone body squeezed/moulded around the hook shank (you dip your fingers in water/dishwashing liquid mixture to stop it sticking to your fingers but not too much fluid or silicone won't stick to shank) - ensure its the clear silicone not the translucent variety. I use the Parafix maxi clear brand. MOuld the silicone into a cylinder around the hook shank
Eyes and gills - red and black marker pen - only cause I didn't have any 3mm prism eyes left
a couple of layers of clear nail polish over the top of every thing - don't brush too much over the marker pen bits as the nail polish can smear them

Also some 3/0 poppers for the bigger queenies that were about last weekend but didn't fancy the little candies


Monday, December 29, 2014

today's flies - tied for next outing

I have used so many mini white clousers and surf candies on the last two outings
I tied a few more - rather than start work on next years lesson plans


will be filling my boat with water tomorrow trying to find the leak it has.
here's hoping in it easy access and small!!!!!!!


Friday, December 5, 2014

I am still in land of living......

I am still in the land of the living but you wouldn't think it given how long since I have blogged

Crazy life at times and with school reports, painting, and other daily stuff so not much fishing lately

But I have my son coming up in a week or so
and a fly fishing mate from Perth coming up for a weeks  remote swoffing in January
over all 6 weeks of school holidays to fish at least three or four times a week weather permitting

Classes are winding down at school
So have started tying for all this SWOFFING I will HOPEFULLY be doing
I have also earned heaps of brownie points with the internal house painting so hopefully will get the time to get some serious swoffing done

Here are some soft blue surf candies I tied today for the Pelagics in the harbour
very Simple pattern to tie:........
Tie in white fibres and a touch of blue
Synthetics last longer with the toothy pelagics
while naturals look better
- choice is yours
you can even go all white

once tied in, tie off thread
then give a light layer of epoxy to the hook shank area, leaving tail section free to flutter in the current
Put on drying rotor till epoxy is set - don't be in a rush even if it takes three or four layers to build up a clear body over the tied in materials on the hook shank
Give enough layers of epoxy till appropriately sized body for the size prism eyes you are using
Again dry each layer on drying rotor
Add prism eyes, add more epoxy
More drying on rotor

Go SWOFFING - too easy

my 20 year old drying rotor
I have caught 30plus fish on the same fly before changing flies. So thanks to Mr Popovics we have a great tough as nails pattern that best of all catches most species out there.

Tuesday, September 16, 2014

BSSS boat boxes made - half flies to go yet

Boxes all been made, varnished and hinged
Half the flies done

Here's a glimpse - size is 420 long and 200 wide, 3 brass hinges, 1x clasp
inside is lined each side with 5mm black hi-density foam

Sunday, September 14, 2014

Tying Pink Things and Wild Things for the BSSS boat boxes

So far in the flies tied for the BSSS Boat boxes, we've covered species who frequent the surface (Crease Fly) and the depths (Clouser Minnow Fly)

Now to cover the Barra, and Threadies

The Pink Thing has been an Australian SWOFFING icon fly, since the early eighties.
Origins spoken about a lot in fly fishing magazines - so wont go into that except the NT as being part of its development.

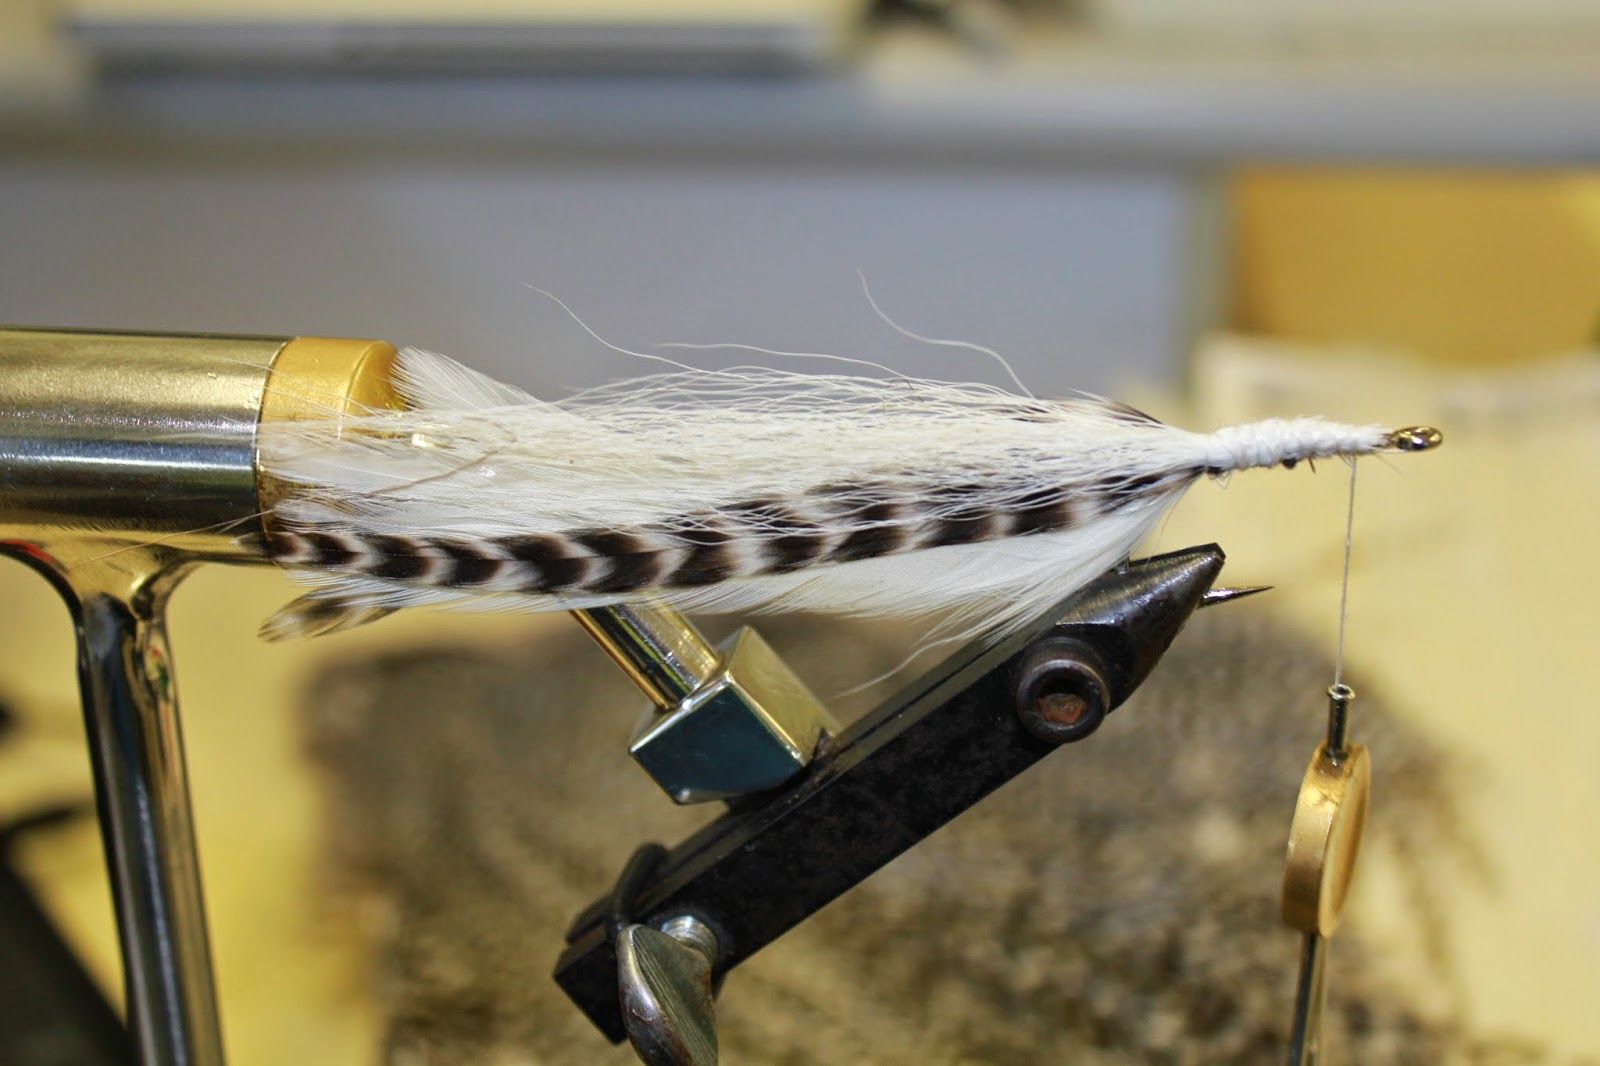
Basically a whistler style pattern - feathered tail, bushy feather based collar, and beadchain eyes
I tie this pattern all in rabbit fur more than I use a feather based traditional style.

However, for the flies to go in the Boat box being made up for BSSS, I will be using some awesome feathers off some full capes supplied for the purpose of tying these flies by NTFFSM founders (the imfamous Rodgie Dodgie and the famously and wonderfully talented Cathie)

So I will have to put on my tying helmet and ensure the "Fly Tying Stig" is up to the challenge of tying some good flies with these quality capes.

Both patterns are basically the same - the difference being primarily and obviously the colours

Lets start tying......
Start with matching up six white feathers for tail - curve in or out is a choice to make. When placed on hook curve out you can get an enhanced kick and flutter. However, for these flies I will tie it curve in. I suggest you take the paired feathers from one side of the cape for one side of fly and from the other side of cape for the other side of the fly - puts the tendency of the feather to sit correctly when stripped through the water.
Like always when tying a number of flies,  I set out all the materials, pre-trimmed of fluff etc, for the feathers I put them between two bits of foam and place a weight on them to keep them all in place

Tying sequence......
Tie on some flash material to go between the paired feather of fly tail
Tie in feathers to form tail section of fly - 3 on each of hook shank
Tie in a grizzle hackle feather each side
tie in a bunch of bucktail - helps keep feather from wrapping into hook bend
Depending on hook shank length, more so on longer shank hooks I would add some crystal or ice chenille for back third of hook shank - adds a subtle mini collar the main collar can flare over.
Tie in your eyes and V shaped mono weed guard now - I find it so much easier to wind the collar up to the eyes than tie eyes and guard in later
Tie in tip of collar feather and wrap around the hook shank flare the feather barbels, keep tying in more feathers until you have a thick full collar
Here, I am using high quality spey feathers from a cape, Spey feather make a collar a bit more sparse than other materials than i usually use. However a mate outfished me by a factor of 4 to 1 using a pick this with such a collar compared to my schapplen based collar at the time. other materials you could use are marabou, rabbit fur, schapplen hackle, normal hackle, even a self made dubbing brush can be used for the collar made from synthetics or natural or combination of both. Love using 'Bird Fur' feathers for this but haven't seen any anywhere for a while now.
I swap threads now and form a tapered thread head in a a hot shot colour - this case fluoro pink.

The wild thing is basically the same but in the colourings of that ever successful soft plastic, the Nuclear Chicken (just not coloured horizontally like the soft plastic) - fluoro feathered tail and hot pink collar.


Friday, September 12, 2014

Tying for Boat Box prize for upcoming NTFFSM - BSSS comp

Been tying furiously for the upcoming saltwater comp at Bynoe run by the NT Fly Fishers Social Mob on the 20-21st Sept - a week and a bit from now.
Not only for myself as I am also tying up 40 or so flies for each of the two boat boxes my woodwork students have made in elective class - they are to be raffle or door prizes at the comp

So far I have tied 20 crease flies, (actually 25)
10 each for the two boat boxes to cover surface action (last five are for me!)
Crease flies are a great surface fly for most NT waters predator species


These Crease flies are tied on O'Shaunessy hooks - these ones are 2/0 stainless
First step is to tie in a bunch of white fibres off the hook bend
Then for this version add a touch of green flash over the top of this
Tie a full length of thread along the hook shank to give something for the foam body and subsequent super glue to stick to.
I tie 10 to 20 of these to this stage before working on the bodies.

I find tying one fly at a time cumbersome, have to change tools too often. Rather focusing on - less tool changes means tying faster.  Before the actual tying of a number of flies of a certain type, I spend a fair bit of time getting ready to tie, like ensuring all material at hand, all the bits cut to size and shape, hooks de-barbed and in a piece of foam so they don't slide about the tying area and later are easier to coat in a batch with nail polish if needed, additionally that all tools in the right places, nothing else on tying area, etc (yes, I am sure I have some level of OCD!)

For the body I use a sticky sided foam I got from Clark Rubber, about 4mm thick and 35-40mm wide. Don't know what is meant to be used for, you can buy it by the metre off a large roll
I cut slightly diagonally across the foam to form a blunt wedge shape - normally for a 2/0 hook I measure the wedge - 25mm across head end and 10mm across tail end.

Now you are ready to take off the protective cover for sticky side and lay pre-tied hook shank along one the edge of the wedge - best about a mm or two from very edge of foam
Evenly fold over, sticky side in, so both edges of foam tape meet just past the thread covered hook shank.
Then hold the tail material out of the way and trim with scissors trim the foam at an angle, just past the hook bend
Sometimes you need to add a little super glue to the thread covered shank to get it all to hold together
If you squeeze edges together for a while it all holds - blowing on it seems to make it work faster - think it has something to do with the moisture in your breathe
Then add your choice of prism or 3D stick on eyes.
Then use marker pen for a black back (you could use green marker), a little touch of red underneath for gills. For the back markings I used to cover top of back in clear nail polish and while still wet dip the area into appropriately coloured glitter powder. Lots of options! Some tyers are now using small air brush guns to paint artistic and realistic patterns - art using the foam back of the crease fly as a canvas!

Now you can cover the join of the edges, the face of the popper and the eyes with epoxy but I find lately I use more often clear nail polish as seems to last as long but is much easier to apply. What ever your choice - cover eyes, front face of fly and areas of marker pen use - at least two coats of the nail polish. Plus nail polish less likely to turn yellow with age like epoxy does.
Be careful with the chemical interaction between marker pen and nail polish as it can 'bleed' the marker pen, I find a light coat of polish applied first without much over brushing then apply more nail polish later avoids this problem
 
Clousers now done - these ones have a white first layer then a sage coloured layer to provide a subtle colour change. For these clousers I have used large beadchain eyes but lead eyes or even plastic eyes can be chosen depending on the depth you want to fish the fly.

The tail material (DNA fibre) I used has enough flash material inbuilt in it, but if the material you use doesn't, add a few fibres of flash between the two main layers of materials - I like the flash buried in the middle of the fly as I feel it provides depth in the fly's appearance when in the water.
These versions for the prize box also have a hot spot of some hot pink heads (and some salmon coloured). I used to do this with some of my trout flies, so I am thinking it would work for saltwater species too (???), Also hoping it to be mistaken for an egg case or the like.
This is done by switching from the white thread used in main stages of making the fly, after fly is finished to your choice of hot coloured thread - fluoro orange and hot pink are my usually choices. Tie off and cut off white thread, then tie in coloured thread and apply a good layer of thread between beadchain eyes and hook eye before tying off. I then give the thread head and eyes - at least two coats of clear nail polish
I chose clousers for the boat box prize due to the breadth of species it can catch.

Got the Pink things and Wild Things to go
pics and tying instructions  to follow soon


Wednesday, August 20, 2014

Life is crazy busy lately

Sorry no blogs lately - life is crazy busy - worse still no fishing happening!

A friend and long time Darwinite tells me, he never goes fishing in the month of August due to the winds
Now I understand him, every morning lately 5-10 knots of wind and rising in intensity through the day
That is except when I can't take a day or even a few hours off and wouldn't you know it - the wind dissipates  
              - uuurrghhhh!    --    Soooooo  frustrating!

Still there is fly tying.......
I have so many flies tied as the wind howls outside, that I may not need to tie anymore till Christmas

I may have to donate a few to local fly club again for door prizes - so I have the excuse to tie some more


These ones are one of the very first saltwater flies
The main ingredient is bucktail

BUCKTAIL BAITFISH - catches most SW predator species
I tie a little flash at bend of hook
Over this I tie some polar fibre - pink or white but mostly white
From hook bend to half way along shank tie some ice chenille - I mainly use pearl ice chenille
Then reverse hook and tie on a bunch of white bucktail with the tips point past the eye of the hook
Put hook right way up then tie on contrasting bucktail colour
wind thread all the way to the eye of the hook being careful not to tie last few wraps of thread too tightly as it may flare the bucktail too much
Ensure all fibres are flat on hook shank, then on front quarter of hook shank apply a few wraps of lead wire up to eye of hook
Apply a few wraps of thread over the lead wire - then apply a little super glue to hold it all in place
Place thread at start of lead wire
Fold bucktail back over the hook shank
Wrap thread at this point to form head of fly - you want the head to bulge a little - the lead wire helps do this
Again be careful not to tie last few wraps of thread too tightly as it may flare the bucktail too much
Tie off thread - optionally I have tied on a band of red thread here to form gills
Give head a lite coating of epoxy - place on drying wheel
Once dry (better if still a little tacky), place on a prism eye on each side of head
Give head another lite coating of epoxy - place on drying wheel
Tie twenty or so or more, and go fishing!

Enjoy!

Monday, August 11, 2014

Barra Thing tying instructions

So was it windy on the weekend - NO!!!!!   (crazy BOM wind forecast)
Did I get anything done that I wanted - NO!!!!  (brother-in-law pinched the tools I wanted before I could!)

So no SWOFFING!, and nothing off the 'to do' list (except reading a few journal articles for an essay I am writing for my Masters Study)
At least I got some fly tying done

Here is one of my top flies - the Barra Thing, that I tied 30 or so of over the weekend.
I don't know the origins of the fly but looking at it, it is definitely a whistler style fly
I have been using it for as long as I can remember
It is a simple fly, easy to tie. using a few and easily obtained materials - mainly rabbit zonker.
I have caught most Estuarine species with this one, in the fresh too where Corroboree billabong Saratoga love a red headed one either white or black for the tail. Even got a small freshwater croc on one once, on a fishing trip to the top of Cape York many many years ago.
The fly has heaps of pulse and push through the water, or fished crawling along the bottom ever so slow
when it has a weed guard - toss into the mangroves or right at the back of the lilly pads


Take you chosen hook and lay down a bed of thread
Tie in a weed guard, I use 20lb nylon covered wire, that hooks over the hook point - leave it straight till it is in use.

Tie in dumbbell, beadchain or other eyes depending on desired fly sink rate - I have used plastic eyes for patterns I want to fish very shallow water with

Tie in some flash, I like using two colours of flash based on the main chosen colours of body and collar materials


Tie in a piece of zonker at bend of hook (extra wide - magnum size I think it is known as commercially) if you have it or can get it)
Unseen in photos but tie in some ice chenille for one third of hook shank - colour appropriate for zonker colours used


Then tie in your contrasting coloured zonker or cross cut rabbit strip between the chenille and the weighted eyes - fill this area thickly with material.

You can then tie in a narrow collar in front of the main collar to add more contrast but I don't do this always - just with this black/red version I really like casting to Saratoga


Tie some more and go SWOFFING!

As you can see below I tie this pattern alot and use it a lot .

you can use all white ones in the salt that work - awesomely!
You can carry permanent markers of various colours and depending on food source, add bars or dots when on the water.
The two tone zonker strips work wonderfully as well


Friday, August 8, 2014

No fishing this weekend - just a little fly tying

Some fish have been caught midweek by others (see  tales from the tinny Facebook), exactly where I was on Sunday in 20_ knot winds, at least it wasn't on the fly. Sadly, I don't think I will be SWOFFING this weekend!

The wind forecast is way up for this Sunday and I really have to make some steel brackets for a bench seat I am making for students at the school I work at - extra credit activity! Additionally, my last subject for my Masters study has also started - essay due in four weeks, article responses every week for next six weeks. uuggghhh!!!!

So seeing I cant always go SWOFFING, I am so glad I have fly tying to break the stress and tension of my busy life.

So on this Sunday instead of being out in hte boat, I will be cutting and welding rather than casting, retrieving, striking and 'yaaahoooing' the many fish I could have caught.

So,tying some flies for that next possible trip I haven't fixed a date for as yet is the next best thing - if not foreplay.

My tying desk is quite untidy at the moment. I had this made almost 20 years ago now, from the day it arrived home, it was too small and has been ever since, I really need five times as many draws now, to make it tidy!

Once I get the write up done of what I was tying, I will post  the step by step image or video.

Friday, July 25, 2014

Boat now starting (Yeehaaaa!), so off to Bynoe this weekend

Got a phone call late Thursday, in middle of a meeting
"do you want to go fishing this weekend?"
The part I needed to replace

Who was this, I thought.......

The voice continued....."If you do, your boat is ready to pickup, and looks like less wind forecast for weekend, which is just right for your sort of fishing" (what's this 'your sort of fishing', I thought SWOFFING was the ONLY sort of fishing, isn't it?)

Still, the penny finally drops and it is 'Frenchies', my boat mechanic who continues, "the boat is fixed and we shut in an hour if you want to pick it up" - I dropped everything

I was in the middle of conducting an iPad training meeting for my fellow teachers, but I gave them all an early mark and raced for the door. "Sorry folks, I got better things to do!"

Instead of waiting two plus weeks for the one particular Mercury part I needed, the awesome guys at Frenchies worked miracles and converted a Suzuki part to do the same job.

Once home I charged the motor battery, then today after coming back from Darwin Agriculture show with the family (gaining lots of 'brownie' points!), charged the trolling battery, checked the fuel, check the oil in motor, checked tyres, and trailer. then sprayed any rust prone bits with lanolin spray.

Clousers
Once that was done, I popped inside to storage area to sort out the gear I would be taking, same as I blogged about previously

Also tied a few more flies as you can never have enough flies with the reported heaps of broad barred mackerel over a metre around the spots I will be fishing this Sunday!

The wife and two kids are coming too, to stay with friends we have at Dundee overnight on Saturday but the fishing on Sunday will be just me - YES! (I am such a hermit according to my wife - maybe so!)

Crease Flies
Report of trip to follow next week!